Yocto Build Appliance Image
Name Last modified Size Description
Parent Directory -
Yocto_Build_Appliance-20210426095757.zip 2021-04-26 10:09 394M Build Appliance Image
Yocto_Build_Appliance-20210426095757.zip.md5 2021-04-26 10:10 77 Build Appliance Image MD5
changelog.xtxt 2021-04-26 09:58 461
ubuntu18.ova 2021-04-30 09:09 24G
ubuntu18.vdi.tar.gz 2021-04-29 16:16 2.4G Build Appliance Image
Contains all preset layers, software and environment to run complete
Linux image build for
- LTPP3g2 boards
- NAND- and EMMC- based Plus1 (SP7021) devices;
in the VmWare or VirtualBox virtual machines running in Linux and Windows.
First-time image build takes about 3 hours. Subsequent -
several minutes.
If you're just an application or kernel module developer please take a look at our
SDK for Linux and for
Windows.
0. Installation
- Download and unpack image
- Create new Virtual Machine in VirtualBox:
-
Name: ...
Type: Linux
Version: Other Linux (64 bit)
Click NEXT.
Click NEXT.
Click CREATE.
Click CONTINUE.
Right-click on your new virtual machine name -> Settings.
System -> CPUs: more then 1 (6 is recommended).
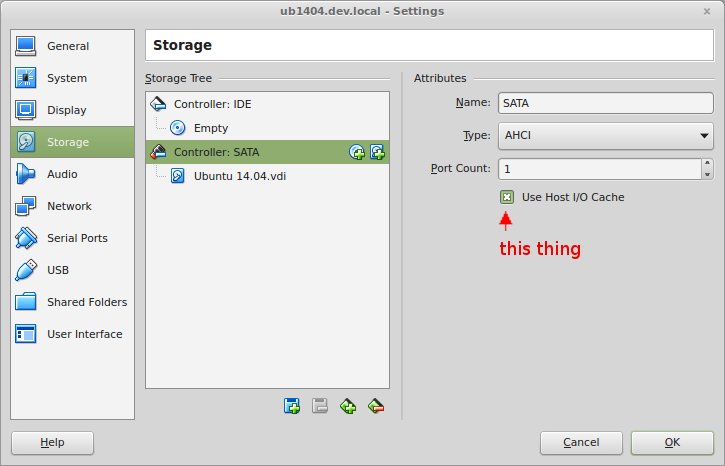
Storage ->
- delete IDE controller
- add 1 SATA controller
BA requires a lot of disk operations so to get accepable
performance enable the
"Host I/O Cache"
setting.
- add 1 existing virtual SATA hdd to SATA controller
In the popup "Medium" box click "Add" and choose your unpacked .VMDK image
- add 1 new virtual SATA hdd to same SATA controoller for SWAP,
type: VDI, size: 4GB
Network (step is optional) ->
- Adapter 1 -> Type: NAT
- Adapter 1 -> Advanced -> Port Mapping
- add 1 rule: proto: TCP, Host port: 8010, Guest port: 8010
Settings complete.
1. First run
Start your new virtual machine.
Add SWAP partition from the second drive to the OS.
After GUI boot switch to opened root CLI with Alt+Tab and run
# cfdisk /dev/sdb
choose gpt label type.
create new partition on hdd and set its type to Linux SWAP.
Write partition table to disk and quit the cfdisk utility.
Format SWAP partition:
# mkswap /dev/sdb1
And save information about swap partition to /etc/fstab:
# echo "/dev/sdb1 swap swap defaults 0 0" >> /etc/fstab
# reboot
After reboot check if swap is attached or not:
# cat /proc/swaps
Add GIT keys
- Send Git access key request to longsonh at sunplus.com.
- Save key to file /home/builder/.ssh/id_rsa
In non-root CLI (with $ sign) check for SunPlus git access:
$ cd /home/builder
$ git clone ssh://git@113.196.136.131:22/qac628/boot/iboot
Accept keys and interrupt the clone action. System is ready!
2. Builds
2.1 Building two parts separately
Build small image without any additional dependencies (4300 recipes):
$ bitbake mc:tpp-tppg2:img-sp-tiny
or build complete open-source test image with some additional software (8000 recipes):
$ bitbake mc:tpp-tppg2:img-tps-free
Optionally: XBoot + arm926 test firmware (2900 recipes)
$ bitbake mc:tpp-tppg2-arm5:img-xboot
2.2 Building two parts at once (11000 recipes)
$ bitbake img-spmn
* First bitbake run is time-consuming. All subsequent builds
are incremental
* Xboot + arm926 firmware is not required for ISPBOOOT assembly.
Script will download this parts from Tibbo website.
3. Assembling ISPBOOOT.BIN from built parts
Deploy dir /disk2/build.26/tmp/deploy/images/ contains image components:
bootloaders, kernel, rootfs images.
Pack the final image:
$ cd /disk2/build.26/tmp/deploy/images/tppg2/
$ make -f ./sp_make.mk
ISPBOOOT.BIN will be placed at ./sp_out/
Slow VM Recommendations
1) Add RAM. Ideally it should have 6 GB of RAM, but 4-5 GB is OK too;
2) add more SWAP (up to 8 GB) and check if the VM is really using it;
3) make sure if your image is attached to SATA drive with "OS disk cache" option enabled;
4) add separate VDI or VHD disk image with FIXED size of 100 GB and mount it to /disk2;
5) switch off DEB packages generation at local.conf (see below);
Open /home/builder/poky/c.tppg2/conf/local.conf, line: 116
PACKAGE_CLASSES ?= "package_rpm package_deb"
change to
PACKAGE_CLASSES ?= "package_rpm"
, save the file and start bitbake again.